 Construction Circle Add
- Step-By-Step
- Tips and Tricks
- Related Tools
1 . Invoke Construction Circle Add by clicking the Construction Circle Add icon, which is pictured above. The icon can be found on the Layout page > Layout section.
Alternative: Invoke Construction Circle Add using the Find Tool by searching the command name and clicking the Construction Circle Add icon, which is pictured above.
Learn more about alternative methods for launching commands.
2 . Place the mouse pointer ( ![]() ) so the target (
) so the target ( ![]() ) is where you want the center of the circle and Left-click ( Locate ).
) is where you want the center of the circle and Left-click ( Locate ).
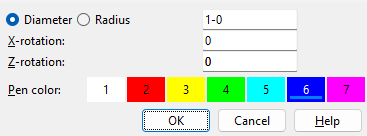
3 . On the Construction Circle Add window, enter the construction circle's diameter (or radius) and other settings.
4 . Left-click ( Locate ) to add a similar construction circle, middle-click ( Repeat ) to add a duplicate construction circle, or right-click ( Return ) when you are done.
- Construction Circle Edit
- Construction Circle Edit All
- Construction Circle Edit window (Modeling)
- Construction Circle Edit window (Drawing Editor)
- Construction Circle Erase
- Construction Circle Erase All (Modeling)
- Construction Circle Erase All (Drawing Editor)
- Construction circle exact point (at center of a construction circle)
- User and Site Options > General > Default color (sets color of newly added construction circles)
- Parametric construction circles (useful for adding construction circles in Modeling )
- Save Construction Lines & Circles
- Load Construction Lines & Circles
- Add Construction Grid (adds a radial grid using construction circles in Modeling )

